Key Takeaways
- Thermostats control your HVAC system by sending signals through various wires.
- Thermostat wires are typically color-coded and labeled to indicate their function.
- It’s essential to match each wire to its corresponding terminal on the thermostat to ensure correct operation.
Looking to install a new thermostat but not sure where to start? Fear not! With a little bit of knowledge, anyone can tackle this common DIY project with ease.
Before getting started, it’s important to understand the wiring and configuration of your thermostat in order to avoid any operational issues or HVAC failure down the line.
Although the wiring for thermostats may seem overwhelming at first glance, familiarizing yourself with wire types, color codes, and their functions can simplify the process significantly.
By carefully placing the wires in their assigned terminals, you’ll ensure proper communication between your thermostat and HVAC system, keeping your home at the perfect temperature year-round.
In this comprehensive guide, we’ll cover everything you need to know about wiring different types of low-voltage thermostats to make your installation process a breeze! Get ready to upgrade your home’s heating and cooling with confidence! 👍
- How Do Thermostats Work?
- Understanding Thermostat Wiring Labels & Guide to Color Codes
- Less Common Thermostat Wires
- Common Thermostat Wiring Configurations for 2 - 8 Wire Thermostats
- How to Install a Thermostat?
- What to Do if You Want to Install a Smart Thermostat but Your Home Lacks a C-Wire?
- Conquering the Art of Thermostat Wiring
How Do Thermostats Work?
Your home’s climate control system relies on an essential component: the thermostat.
This device senses the temperature in your home and sends signals to your HVAC unit to regulate it according to your temperature settings and preferences.
The thermostat connects to your HVAC through a set of wires. These wired terminals are clearly marked for setting up connections such as heating, cooling, or fan functions.
Additionally, there is a separate terminal that supplies the power to run all of these features.
Don’t underestimate the role of these wires. Your thermostat plays a vital role in managing your HVAC system, and it is only able to do so through these wires. It is crucial that they are set up correctly for the correct functioning of your heating or cooling.
Related: How Do Smart Thermostats Work & Other Frequently Asked Questions
Equip your HVAC system with smart features and achieve the perfect balance between comfort & savings.
Learn more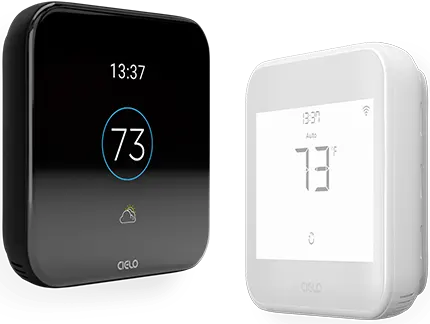
Understanding Thermostat Wiring Labels & Guide to Color Codes
Understanding thermostat wiring and color codes is crucial for successfully installing, upgrading, or troubleshooting a thermostat.
It’s like the conductor of an orchestra, the wiring brings all the elements of your HVAC system together to create a symphony of comfort.
Each wire serves a specific purpose, and familiarizing yourself with them is critical.
It’s important to note that a thermostat base can have anywhere from 4 to 16 terminals, depending on the features and functions of the device and the type of HVAC system it’s designed to control.
While each terminal should be labeled, there may be variations between manufacturers in the standard lettering system.
Nonetheless, there are some commonly accepted conventions that can serve as a guide.
Keep in mind that not all terminals need to have wires passed through them. Which ones you’ll use will depend on your specific HVAC system.
When installing a thermostat, it’s best to refer to your manufacturer’s wiring images for your specific model. Gain confidence in your installation skills with this breakdown of each wire’s purpose and terminal association.
| Color (Terminal) | Function | |
|---|---|---|
| Red (R) | Power | |
| Red (RC) | Cooling power | |
| Red (RH) | Heating power | |
| Yellow (Y Wire) | Cooling | |
| Yellow (Y1) | Stage 1 cooling. In heat pump systems, Y1 controls the compressor, which both heats and cools your home. |
|
| Yellow (Y2) | Stage 2 cooling | |
| White (W) | heating | |
| White (W1) | Stage 1 heating | |
| White / Brown (W2) | Stage 2 heating | |
| Green (G) | Fan | |
| Black/ Blue (C-Wire) | Smart thermostat power supply | |
| Orange/ Blue (OB) | Reverse valve heat pump | |
| No universal color (X/Aux) | Auxiliary heat or stage 2 heating | |
| No universal color (S) | Outdoor temperature sensors | |
-
G Wire: Green
The green wire, labeled G, is your key to regulating HVAC airflow.
This wire connects to the G terminal on your thermostat and controls the HVAC fan or blower that circulates hot or cool air.
By selecting “Auto” or “On” on your thermostat, this wire kicks into gear and promptly turns the fan on or off.
-
R, RC, or RH: Red
The red wire is the power wire and is a critical component of your HVAC system.
- Power supply: The red wire’s primary function is to supply your thermostat with a steady stream of 24V AC power, so your device can function flawlessly.
- Heating power: If your red wire is labeled RH, this comes from the heating system.
- Cooling power: If your red wire is labeled RC, it connects your thermostat to the cooling system.
Some systems that only have one Red wire will just call it ‘R’ instead of ‘RH’ or ‘RC’.
Dual transformer systems: In these types of systems, separate transformers power the heating and cooling processes. In this case, you’ll find both RC and RH wires. The RC wire connects to the cooling transformer, while the RH wire connects to the heating transformer.
Note: In older systems, a jumper wire manually connects two terminals on a thermostat base and is commonly used to connect RC and RH terminals in single transformer system.
Most modern smart thermostats, however, don’t require an external jumper wire as they are smart enough to do that internally.
If your system has a single R wire, insert it into the RC terminal on your thermostat. If your system has multiple, insert RH into the RH terminal and R or RC into the RC terminal.
Note: Remember, wiring can slightly vary depending on the thermostat manufacturer and HVAC system. It’s best to consult the thermostat manual for specific instructions.
It’s always recommended to look at which wires are inserted into which labels on your previous thermostat and take a picture to serve as a guide when you are replacing your thermostat.
-
Y or Y1: Yellow Thermostat Wire
In traditional cooling systems, the yellow wire controls the cooling function.
In a heat pump, it controls the compressor, which can both heat and cool your home.
The yellow wire is connected to the Y or Y1 terminal on your thermostat.
In a multi-stage cooling system, this serves as the first stage.
-
Y2: Yellow / Light Blue
If you’re lucky enough to have a two-stage cooling system, take note of the yellow or light blue Y2 wire – it’s your key to unlocking extra cooling (or heating – in case of a heat-pump) power when you need it most.
When single-stage cooling or heating just isn’t cutting it, the Y2 wire signals the second compressor to kick in and provide the additional cooling / heating capacity you need.
Stay comfortable, even on the hottest or coldest days, with your two-stage system and the power of the Y2 wire. Y or Y1 wire is present if your home has single-stage cooling. If there’s a 2-stage cooling, you will also have a Y2, which is also a yellow (or in some cases light blue) in color.
-
W, W1, AUX, or AUX1: White/Other
The W or W1 wire connects to your conventional heating system and signals it to start working when you need it.
Simply insert it into the W or W1 terminal, and you’re good to go.
If you have a furnace or boiler, a white wire will definitely play a crucial role in keeping you warm.
If you have an air conditioner or heat pump with auxiliary heating, the AUX/AUX1 wire will be inserted into the W1 or AUX terminal on your thermostat.
Note: There is no universal color for the AUX wire.
-
W2, AUX2, E, E/AUX, E/EM: White/Brown/Other
Got a two-stage heating system?
The W2 wire is what you need to know about.
This controls the second stage of heating, which can be the high heating stage in a conventional furnace, an electrical source, or auxiliary heat.
This is typically used during really cold weather or when the first stage just doesn’t have enough power to keep you comfortable.
When your first-stage system can’t fulfill heating requirements, a separate second stage comes into play.
This is known as auxiliary heat.
If there isn’t an AUX terminal available, just pop the AUX2 wire into the W2 terminal.
Heads up, heat pump owners with auxiliary heating! If you’ve got wires labeled AUX/AUX1/W2 and AUX2, be sure to put the first one in your W1 terminal and the AUX2 in your W2 terminal on your thermostat. (Again, always refer to the manufacturer’s guide first).
In some systems, the AUX wire can be labeled as E, which refers to emergency heat. This is because when a heat pump malfunctions or cannot adequately heat a space, emergency heating comes to the rescue. This is your backup or supplemental heat source.
-
O, B, or O/B Wire: Orange/Blue
Discover the vital O/B wire that makes up heat pump systems.
This wire, usually orange in color, needs to be connected to the O/B terminal on your thermostat.
Not all thermostats display a clear O/B label, so check your system’s manual.
Depending on the thermostat, you may find two separate O or B terminals or have them combined into one O/B terminal.
This wire serves as a vital connection to switch between cooling and heating modes by controlling the reversing valve on your heat pump.
In some units, the O/B or O wire activates the cooling mode by sending a signal to the reversing valve.
In some heat pump systems, the O/B or B wire controls the reversing valve for heat mode. This signal activates the reversing valve to generate warm air.
-
C-Wire: Black/Blue/Other
The C wire, also known as the common wire, is usually black but can be blue or any other color than the commonly used red (R), white (W), green (G), yellow (Y), or orange (O/B) wires.
The C-wire is responsible for providing a continuous power supply from the HVAC system to your thermostat.
This enables advanced features like WiFi connectivity, LED backlighting, touchscreen operations, and programmable settings to work seamlessly.
Even when you’re not actively telling your HVAC system to heat or cool your home, the smart thermostat stays connected to your WiFi network to receive commands from mobile apps or smart home devices like Alexa or Google Assistant.
Unfortunately, not all HVAC systems come with a C wire. This can be a major problem if you’re looking to upgrade to a smart thermostat.
But there are solutions – you can either have an additional wire added to your system (which can be costly and inconvenient), or you can use a C-wire transformer.
If your HVAC system has a C-wire but it doesn’t run to your thermostat, you can simply use a C-wire adapter. Don’t let the lack of a C wire hold you back – upgrade to a smarter, more efficient home today!
Less Common Thermostat Wires
If you notice your HVAC system has wires other than the common ones mentioned above, then it may offer additional features.
Some features may be advanced, such as third-stage cooling or heating, where a professional may be needed for correct wiring installation, depending on your thermostat.
On the other hand, some wires may not be needed for your thermostat type, such as the S wire can be ignored if you’re rocking a smart thermostat.
|
Label |
Function |
|
L |
Error indicator in old thermostats |
|
S, S1 or S2 Wires |
Outdoor temperature sensors |
|
G2, G3, GL, GM, or GH |
Controls multiple fan speeds |
|
Y3 Wire |
Manages stage 3 cooling |
|
W3 Wire |
Controls stage 3 heating |
|
O & B wires |
Decides when to switch between heating and cooling |
|
H/ HUM/ HUM1 and H2/HUM2 |
Controls whole-home humidification |
|
D/DH/DHUM/DEHUM1 and DH2/DHUM2/DEHUM2 |
Controls whole-home dehumidification |
-
L wire
Older thermostats often had and some required an L wire to power error indicator lights.
Smart thermostats use LCD displays that render the L wire unnecessary.
-
S, S1 or S2 Wires
Outdoor temperature-related information is provided to your thermostat via the S wires which connect to an outdoor temperature sensor.
In older models, S wires also serve as indicator lights.
However, if you are using smart thermostats, the S wire is dispensable as these thermostats are equipped with WiFi to collect weather data.
Also, smart thermostat use LCD displays instead of an indicator light. If you’re installing a smart thermostat, you can simply tuck away the S wire.
-
G2, G3, GL, GM, or GH
Some HVAC systems support multiple fan speeds.
In these units, the fan speed is either controlled by the HVAC control board or the thermostat.
To determine which one is responsible for managing the fan speed, simply look at the number of G wires on your thermostat.
A single G wire indicates that the control board is in control, while multiple G wires on the thermostat signal that the thermostat regulates the fan speed.
G2 or GM wire controls the second speed of the HVAC fan while G3 or GH manages either the second or third speed.
When it comes to their installation, these specialized wires require professional assistance to ensure proper functionality and safe use.
-
Y3 Wire
If you notice a wire connected to your thermostat’s Y3 terminal, you have a three-stage cooling system.
Most smart thermostats are not compatible with this feature.
One solution is to install a jumper cable between the Y2 and Y3 terminals on the HVAC control board.
However, it is recommended that you don’t make modifications on your own and seek professional help.
-
W3 Wire
If you notice a wire connected to the W3 terminal on your thermostat, it means you have a three-stage furnace and it may control your emergency heat as well.
However, most smart thermostats do not support this feature, so it’s important to know your options.
One simple workaround is to utilize a jumper cable between the W2 and W3 terminals on the control board.
However, it’s best to contact an HVAC professional before making changes in this case.
-
O & B wires
By communicating with the compressor, the O and B wires dictate when your heat pump should switch between cooling and heating modes.
If you just have a B wire and don’t have the O wire, connect it to the O/B terminal on your thermostat.
If O and B wires are separate in your current setup, it’s best to seek out an HVAC professional for their installation.
Sometimes, the common wire required to power a smart thermostat may be labeled as a B wire. Contact your thermostat manufacturer if that’s the case.
-
H or D wires
The H, HUM, HUM1, H2, HUM2 wires refer to the control of your home humidification system.
The D, DH, DHUM, DEHUM1 or DH2, and so on refer to the control of your home dehumidification system.
If you have a wire that is not a part of the above list, it’s best to get in touch with a professional!
Some wires, such as the L1, L2, 110, 120, or 240 volts can be dangerous, indicating a high voltage system.
Common Thermostat Wiring Configurations for 2 – 8 Wire Thermostats
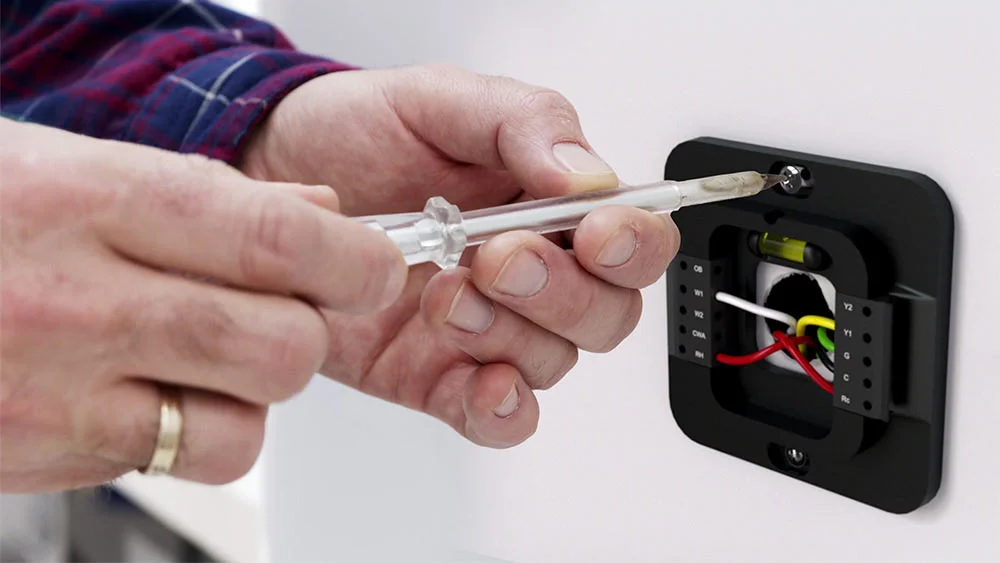
To simplify a new thermostat installation process, you may want to label all the wires with small tabs of masking tape or wire labels that some thermostats provide in the box.
This should be according to how they are inserted in your previous thermostat, as not always will a wire’s purpose correspond to its color.
Also, sometimes, your new thermostat will not use all the wires that were connected to the old thermostat.
You may also find extra terminals that don’t apply to your HVAC system, but that will not cause any issues.
Here are some common thermostat wiring configurations and how to install them:
-
2-Wire Thermostat
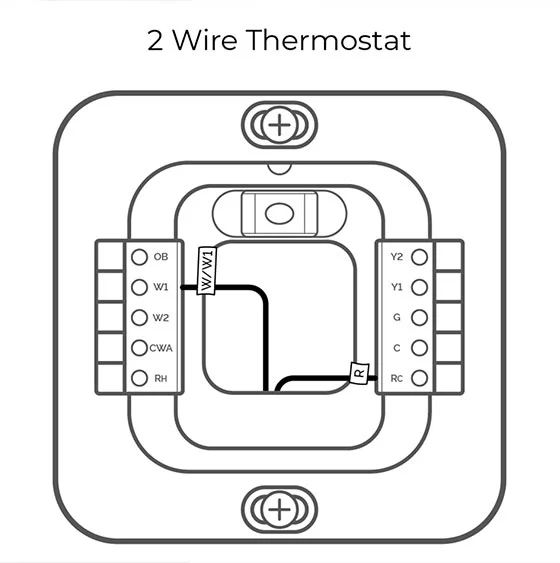
This is the most basic thermostat wiring configuration, especially in older thermostat installations, and it normally involves a heating-only system such as a baseboard heater or gas furnace.
The two wires are:
- Red, R wire: The thermostat uses this wire to send power to the HVAC heating equipment, and in some cases power itself from it too. It connects to the R or RH terminal on your thermostat.
- White, W wire: This signals the heating system to switch on or off. It is responsible for activating the heating process. It connects to the W terminal on your thermostat.
If you want to install a smart thermostat, you will require a C wire.
In the case of a 2-wire thermostat and no C wire at the HVAC system, you can opt for a third-party 24-volt transformer which will give you a RC and C wire, this can power the smart thermostat itself, while it can use the Rh wire and W wire to run your heating!
-
3-Wire Thermostat
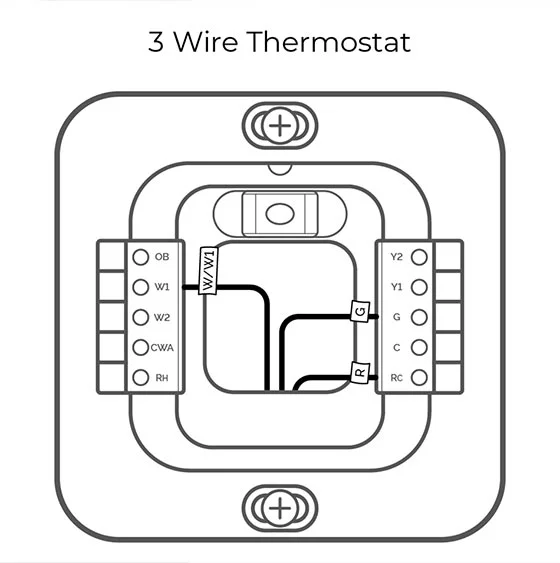
3-wire thermostats are commonly used for controlling furnaces and heaters.
You will notice these 3 wires – R, G, and W.
- Red, R wire: This carries the 24V power supply to the thermostat, thus allowing it to communicate with your HVAC system. Usually connected to the R or Rh terminal.
- White, W wire: This signals the heating to switch on or off as needed.
- Green, G wire: This wire operates the blower fan in your HVAC system. If you’re installing a smart thermostat and you don’t have a C wire, the G wire here can be repurposed as the C wire by inserting it into the C wire terminal at the thermostat and HVAC ends, while connecting the G terminal at HVAC to the W terminal. This can get technical.
The downside of repurposing the G wire is that you won’t be able to control your HVAC fan independently. A better, quick option is to install a third-party device called a common maker or a 24 V transformer (in case the C wire is absent on your HVAC system)! Then you will also be able to control your fan.
-
4-Wire Thermostat
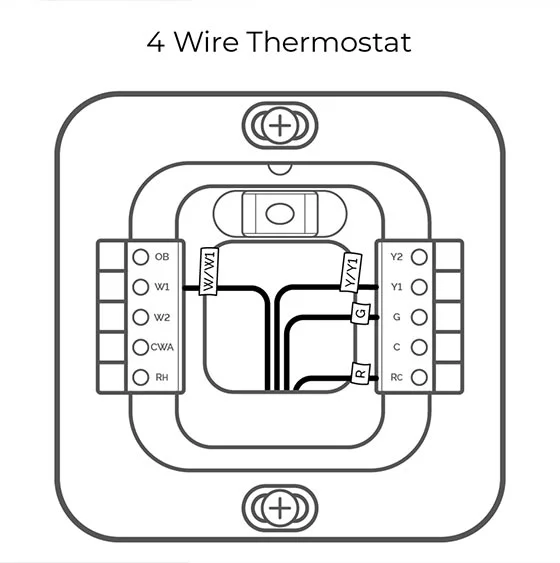
The most common configuration of a 4-wire thermostat is:
- Red, R wire: This carries the 24V power supply and is responsible for the functioning of the thermostat and communicating with the HVAC system. Insert it into the R or RC terminal.
- White, W wire: This is the heating wire and signals the heating system. Insert it in the W or W1 terminal.
- Green, G wire: This operates the blower fan.
- Yellow, Y wire: This is the cooling wire and signals your air conditioner to start Cooling process or heat pump to start the cooling / heating process. Insert it in the Y or Y1 terminal.
If you’re installing a smart thermostat and your HVAC system does not have a C wire, you can use a C-wire transformer or a C-wire adapter (needs a G and Y wire to be present) if the C wire doesn’t run to the thermostat.
-
5-Wire Thermostat
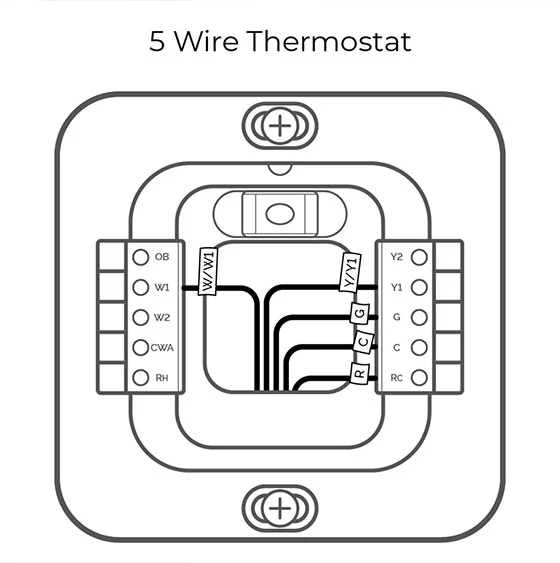
The 5-wire thermostat wiring configuration is:
- Red, R wire: The red wire provides the necessary 24V power.
- White, W wire: This wire signals when it’s time to use conventional heating to heat your home.
- Green, G wire: It operates your HVAC fan.
- Yellow, Y wire: This wire signals your air conditioner to start the cooling process when needed.
- Black or Blue, C-wire: It provides continuous power to the smart thermostat.
This thermostat configuration is quite versatile as it has a C-wire that most smart thermostats require for their advanced functions.
-
6-Wire Thermostat
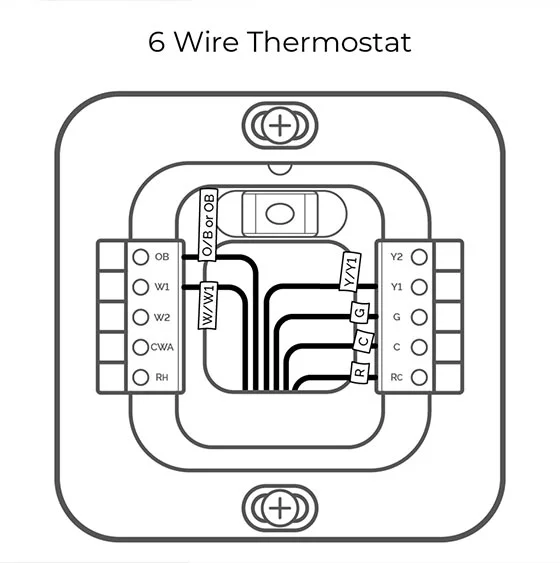
Advanced HVAC systems require 6 wires:
- Red, R wire: This carries the power that allows the thermostat to control your home temperature.
- White, W wire: This turns on your system’s conventional heating mode.
- Green, G wire: This wire is responsible for connecting the fan to the thermostat, allowing it to turn on and off according to your heating and cooling needs.
- Yellow, Y wire: This is a cooling/compressor wire and goes into the Y terminal.
- Black or blue, C-wire: It is a low-voltage wire that provides a continuous source of power to your smart thermostat.
- Dark Blue/brown, B wire or Orange, O wire: This wire is responsible for switching your heat pump from heating mode to cooling and vice versa. In some HVAC systems, the sixth wire can have a different purpose. In this case, attach it to the corresponding terminal based on system instructions.
In addition to the basic 4 wires, they will need a C wire for the smart thermostat and an O/B wire as a reversing switch wire.
-
7-Wire Thermostat
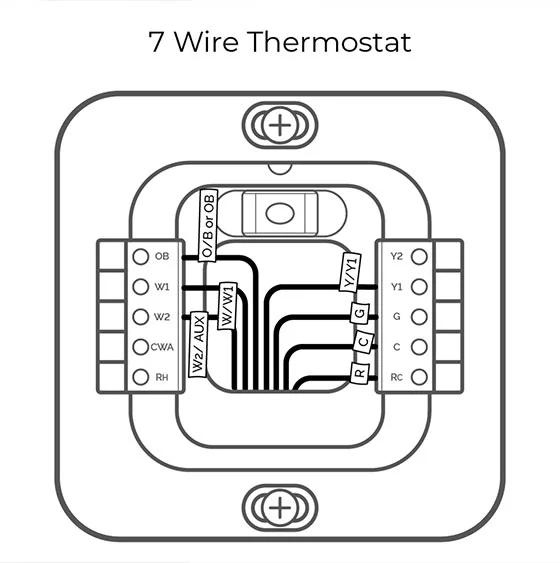
The 7-wire thermostat configuration is:
- Red, R wire: This wire is responsible for delivering power to your heating and cooling system. Attach it to the R terminal.
- Green, G wire: This one connects to your HVAC fan.
- White, W wire: It is a heating wire and connects to the W or W1 terminal.
- Yellow, Y wire: It is a cooling/compressor wire and goes to the Y terminal.
- Black or blue, C-wire: This wire provides a continuous 24-volt power supply to smart thermostats in order for them to utilize their smart functions 24/7.
- Dark Blue, B wire or Orange, O wire: These wires allow your unit to switch from heating to cooling and vice versa. The dark blue wire goes to the B terminal, and the orange wire to the O terminal.
- White or Brown or light blue wire, AUX wire: This provides second-stage heating to your home and goes to the X/AUX or W2 terminal. In a 7-wire thermostat, you will have a light blue wire or a brown wire, but never both.
These 7-wire thermostats are often required in more sophisticated systems like those with 2-stage heating or AUX.
-
8-Wire Thermostat Wiring
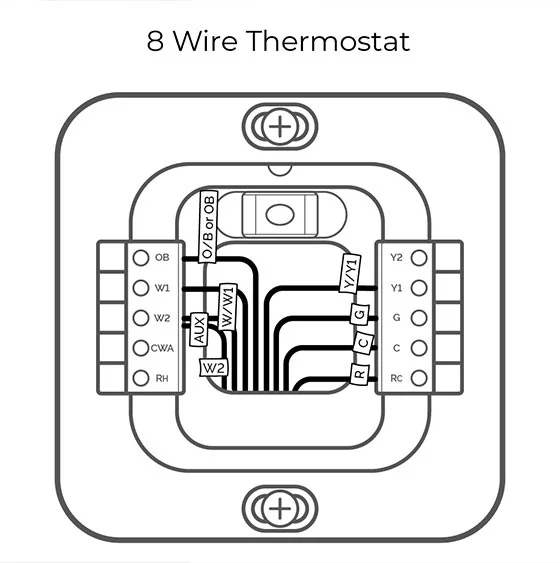
An 8-wire HVAC system uses 8 wires for thermostat control.
Each additional wire provides more functionality compared to systems with fewer wires.
Here’s the wiring configuration for 8-wire thermostats:
- Red, R wire: It delivers power to the system and should be attached to the R terminal.
- Green, G wire: The green wire is responsible for connecting your HVAC fan.
- White, W wire: It is responsible for heating and connects to the W or W1 terminal.
- Yellow, Y wire: This wire facilitates cooling and connects to the Y terminal on your thermostat.
- Black or blue, C-wire: Smart thermostats require a C-wire to provide a continuous power supply.
- Yellow / Light Blue, Y2 wire: Wire to Y2 for second stage cooling.
- White / Brown, W2 wire: Wire to W2 for second stage heating
- Orange wire or Brown wire, AUX or E: Goes to AUX or E terminal and is used for auxiliary or emergency heat.
If your thermostat doesn’t have an aux terminal, you can either tuck away the Aux/E wire OR insert it into the W2 terminal. This way, your Aux/ emergency heating will work along with the 2nd stage heating, but you will lose individual controls.
The wires can greatly differ from system to system in an 8-wire configuration.
For example, if your system is a heat pump you may have an O/B wire to control the reversing valve. The additional 8th wire can also be to control a humidifier, dehumidifier, ventilation system, or another component.
It’s best to consult your HVAC wiring diagram, thermostat manual or a professional in case of confusion.
How to Install a Thermostat?
Installing a thermostat may seem intimidating at first, but with a little guidance, it can be a straightforward process.
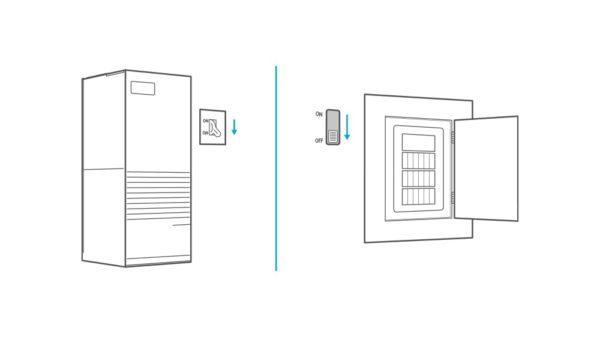
1. The first step is to ensure safety by turning off the power to your HVAC system by shutting off the circuit breaker or your unit’s master switch.
2. Go to where your current thermostat is installed and remove its faceplate. Inside you will see all the thermostat wires connected to their corresponding terminals.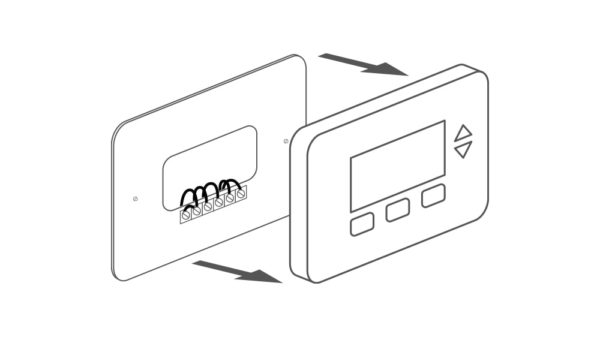
3. Take a picture of the wiring setup. It will help you connect the wires later on. You can also label the wires with wire labels if provided or use masking tape. Write the letter indicative of the terminal it’s connected to on the tape.
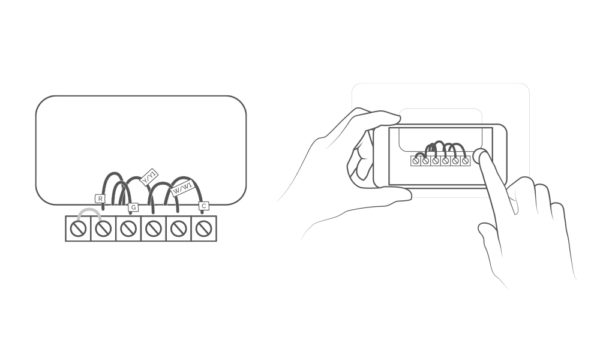
4. Disconnect the old wires and take off the old backplate.
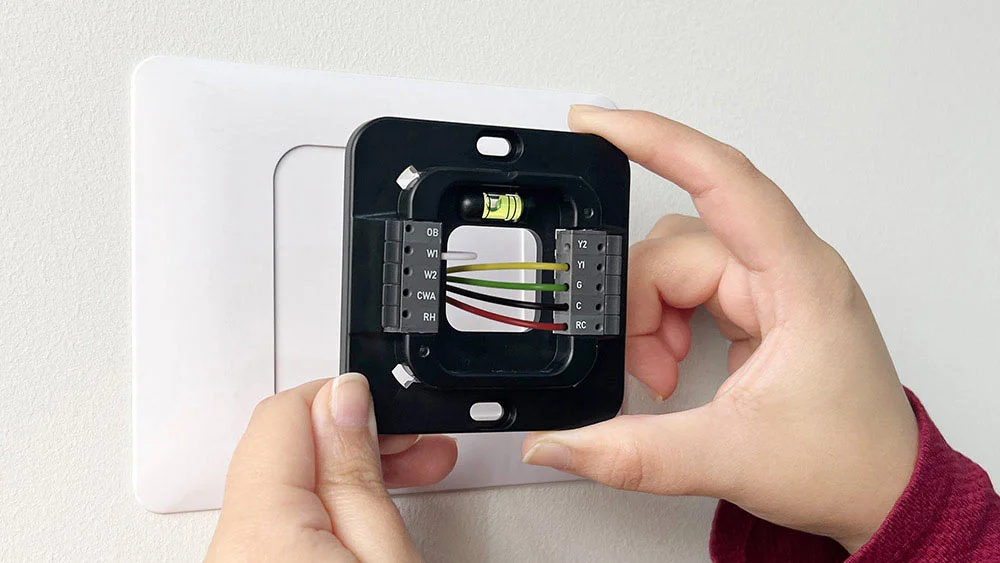
5. Screw in the new backplate and take out the wires from the holes in the plate.
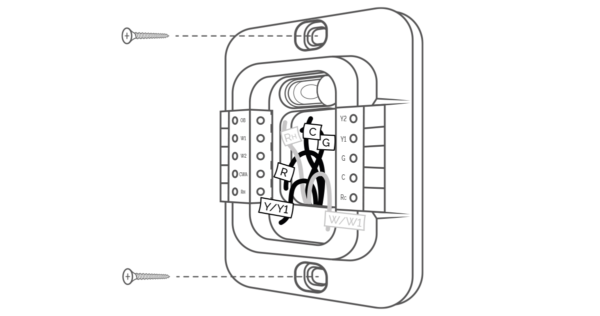
6. After that, insert the wires into the corresponding terminals. You can refer to the picture taken earlier. The wiring configuration discussed above can also help, especially if you’re switching from a standard thermostat to a smart thermostat.
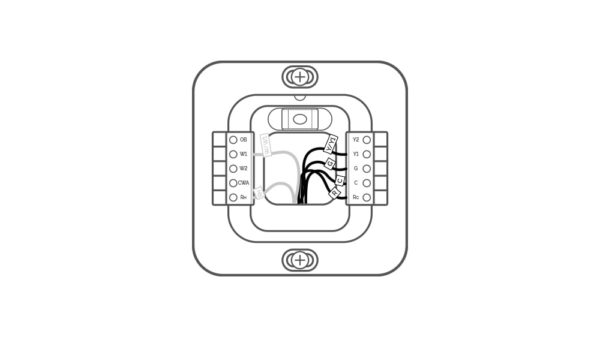
7. After your wiring is done, you can put on the new faceplate and turn on your HVAC system.
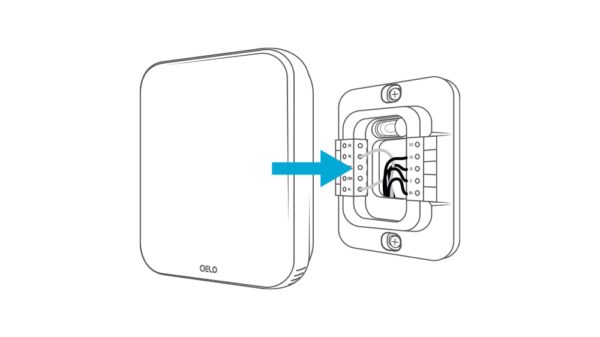
Check this detailed guide on how to install a smart thermostat.
What to Do if You Want to Install a Smart Thermostat but Your Home Lacks a C-Wire?
If you want to install a smart thermostat but lack a C-wire, don’t fret, there are several options to consider.
-
Add a C-Wire Adapter
A C-wire adapter, also known as a power extender kit, is an accessory that helps smart thermostats get the power they need to function optimally.
If your HVAC system has a C-wire terminal but no wiring, and there are G and Y wires available to the thermostat, then a C-wire adapter is the best accessory to solve your problem.
Connecting the adapter to your smart thermostat is easy; you just have to follow your manufacturer’s guidelines, and the setup will be operational in no time.
Here is a detailed installation guide by Cielo: https://support.cielowigle.com/hc/en-us/articles/13133416929431-Installation-Guide-
-
Use the G Wire as C-Wire
It is possible to use the G wire as a C-Wire, which can be a simple solution to power a Wi-Fi thermostat without installing an additional wire.
The G wire, often green, is the fan wire connected to the G terminal on your thermostat.
Disconnect it from the G and connect it to the C terminal.
You need to do this on your HVAC system as well as the thermostat.
Although this option sounds convenient, it has some limitations.
By using the G wire as a C-Wire, you will lose fan-only mode, which means you will not be able to control your HVAC blower fan.
-
Use a C-Wire Transformer / 24V Transformer / Add a Wire Kit
If your HVAC system does not have a C-wire terminal, a C-Wire transformer (also known as add a wire kit or power extender) is a great, cost-effective solution to solve the issue.
The only downside is that you will have a wire emerging from your thermostat and going to a power source which can be unsightly.
This transformer contains wires that can be used to power your new smart thermostat.
Simply follow your transformer’s instructions to connect the transformer to your thermostat.
You will mainly need to insert a wire in the C terminal of your thermostat and another in the RC.
When you’ve connected other thermostat wires, power up your thermostat and power on the transformer!
It’s as easy as that!
-
Opt For Battery-Operated Smart Thermostats
Some smart thermostat models use lithium-ion batteries to draw power and do not require any C-wire.
However, you should remember that these types of thermostats may be more prone to accuracy issues and temperature fluctuations.
Generally, they don’t have amazing reviews.
Conquering the Art of Thermostat Wiring
A properly functioning HVAC system is essential for a comfortable home climate, and the thermostat plays a crucial role in maintaining the environment.
Understanding thermostat wiring comes in handy when you need to install a new thermostat or troubleshoot your current device.
By familiarizing yourself with the terminal letters, what they stand for, and what each wire controls, the complex task of thermostat wiring becomes quite a simple task!
While this comprehensive guide aims to cover complete knowledge on how to install low-voltage thermostats, there still will be many cases where things are not done by the book.
Numerous homes or thermostat/HVAC manufacturers may not be following the standard wiring configurations and in these cases it may be best to consult a professional for advice.
